Showing posts with label lace. Show all posts

Wednesday, January 8, 2014

Scrappin Happyxo 5000 Subbie Fabric Page Challenge

Hi all:

If you know me, you know that I love YouTube University.  You can learn just about anything there!  But what I love the most is that it is a community.  And for me, I like being a part of a group of women and men that love to craft as much as I do.  And so in my free time (I know, what's that???) I watch a lot of videos. Sometimes it's to learn how to use a product, sometimes to learn a new technique, and sometimes just to be entertained.  And of course, there's lots of inspiration there!

One of the ladies, Jeanette, that I've been watching for years, has reached a milestone.  5000 Subscribers! What an amazing accomplishment. And she is having a challenge to celebrate.  Her subbies are being challenged to create a 6x4 fabric page, sticking as close to possible with the color format that she's chosen, to be included into a book that she will put together as part of a prize for two winners.  There will be three prizes in all. 1. for a subbie's comment, 2. if you create an entry and blog/facebook/pinterest/video/photograph it, and 3. if you snail-mail your entry to her.  Oh, how that is going to be one beautiful book! Lacey, fabric goodness...

Here is the page that I've created to be entered into this challenge


Recipe for this page: fabric, lace scraps from my stash, RAKd/Prize flower, flower center, and flower trim from (Fiona) Jennings644, RAKd leaf pin and pearl trim from Sharon S.

In reality, because each of the pages that will be snail-mailed to her will be added into the book, it makes sense not to add a lot of dimensional embellishments to the page.  And even though I won't be mailing my entry, I settled for making a dress form layered with lace for some dimension.  Just because I'm one of those people that likes to stick to the rules. LOL.  Some parts of the page are sewn together, while some parts were put into place using my hot glue gun.  I like that I was able to use scraps of fabric and lace left over from making flowers to create this page.  And I really like how it turned out!

You can view her channel - and see the rules for entry - at http://www.youtube.com/user/ScrappinHappyxo?feature=watch and also view one of her fabric journals a thttp://www.youtube.com/watch?v=YSRGD7vWuUM .   

Thanks for stopping by and taking a peek.
Until next time, as always, 
Hugs+Kisses
Renee


Monday, November 11, 2013

Craftyhands Challenge Blog

Hi all:

I've found another challenge blog - http://craftyhandsdevon.blogspot.com/.  They are an Anything Goes Challenge Blog.  Their challenges run every two weeks.  Bonus? Prizes. More bonuses? Blog exposure, meeting new friends from all over and practice, practice, practice.  I have the feeling that I'll get a lot of inspiration from there.

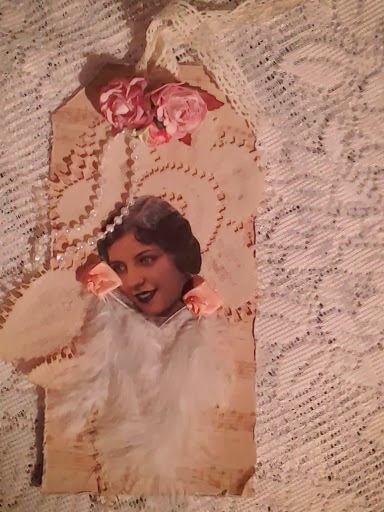
I've made this tag for their latest challenge in creating a project that is "Vintage."


Products used to create this tag: scrap feathers, fabric flowers, scrap lace, pearls, chipboard, and pp


Entering this project into this challenge


Until next time
Hugs+Kisses
Renee

Wednesday, October 2, 2013

Altered Tray

Hi faithful friends!

Thanks for stopping by.  I appreciate all of your support...I really do.

Over at http://scrapsofcolor.ning.com/events/that-s-alterable-challenge-2013 we are continuing our monthly 'alter it!' challenge.  Which I am so enjoying!

This month we were to alter a tray.  And of course, I just so happen to have an old dusty and stained one available.  It's a really good size too.  I guess that's why I never tossed it out.


It took a lot of gesso and  acrylic paint  to cover up all of stains....but I finally got it covered....whew! I then added a coat of ModPodge to that.  I used patterned paper from the Color Bok Veranda stack and added a piece of lacy seam binding to cover the seam.  There is a 1inch width strand of ruffled lace around the entire outside edge of the tray. And a strand of pearl bling along the entire inside edge.  I added a final coat of ModPodge to the entire tray.  To complete the tray, I added felt pads to the bottom for stability.  By the way....Did I say how much I love, love, love this paper?! I'd like to get a stack with the same pattern in different colors if that were possible.

My daughter saw the finished product and wanted to know if it were for her house since her bedroom has these colors...wink, wink....hint, hint....After disappointing her and telling her that it was for a friend...I quickly let her off of the hook and told her "Of course it is!" To which there were no words...just a very loud "SIGH!"  It's so nice that my baby has been digging through my crafty items to find things for her house.  But she's been eyeing my paper doll collection a little too hard!!!!  I may have to make several for her.  It's hard letting go of your "first" of anything isn't?

Like I said, this monthly journey of altering every day items has been a blast....thanks Tiare....I hate to see the year end. LOL.

Until my next altered item....
Hugs+Kisses
Renee

Thursday, August 22, 2013

That's Alterable!

Hi all:

The altering stuff journey continues over at all:http://scrapsofcolor.ning.com/events/that-s-alterable-challenge-2013.

This month we alter cans. Yup, cans. Soup cans, craft paint cans, veggie cans.  Any kind of can.

I decided to try out one of the new stencils that I received in the mail this morning that my friend Sharon was kind enough to send to me.  She has been cutting them on her Cricut with her latest cartridge buy.  I can tell that she's having a really good time making them, can't you? LOL


And I can't wait to try them all!


This is the can that I altered
 

Products used: soup can, gesso, texture paste, patterned paper, lace and stencil

This is the stencil that I used

Now I've got to say....I've been doing really good not buying a bunch of craft items that I don't really need...and trying to use what I've got....but being able to cut my own stencils sounds great...and seeing how much fun Sharon is having and how great they're turning out - realllllllly makes me want this cartridge!

I'll be good until I've used all of the ones that Sharon sent to me and the ones that I already own that haven't even been taken out of their packages...but I don't know how long I can hold out.  Besides, remember that I told you that my Cricuts and eBosser are collecting dust?  Maybe getting this cartridge will make me pull them out and actually USE them! LOL

Thanks Sharon for thinking of me....and your subtle and unaware hint to buy this cartridge....
Anyway, until next time
Hugs+Kisses
Renee

Monday, August 19, 2013

Brown Sugar Challenge #55

Hi all:

There's a challenge over at the Brown Sugar Challenge Blog to do a project using the colors blue, green and white.  I wanted to do a CAS card for this one.  And so I cut out a dress form by freehand, added "scalloped" lace edges to the form, and then used my Timmy alcohol inks to color it.  I added a scrap piece of lace, some bling and a simple sentiment to finish the card off.

The cardstock and patterned paper base is by Colorbok.
Check out http://brownsugarchallenge.blogspot.com/ for your chance to enter this challenge!
(New challenges are posted every Friday)

This challenge is being sponsored by 
 
http://www.guylousinimitability.com/


Thursday, August 8, 2013

Altered Muffin/Cupcake Tin

Hi lovelies:

I'd like to share a project with you all that I just completed recently.  As you may know, I have inadvertently become a Youtube junkie! Yes, me, a junkie for videos.  And not just "crafting or scrap booking" videos.  If something catches my interest; I'll take a look at it.  People playing pranks on each other, babies doing amazing things, animals that "talk," street fights, music, whatever.

My friend, Sharon S. (http://seraph1959.blogspot.com/) asked to do a one-on-one swap with me when   this idea got her bubbling over with excited energy after she had watched a video.  She sent a link to that video showing an altered muffin tin.  Sooooo dang ca-ute! You altered the muffin tin by painting and decorating the tin itself.  Which surprisingly was the hardest part; as I tried to paint it without leaving a lot of paint streaks.  And then you created "muffin/cupcake liners" to fit inside.  Although I'm sure you could use real liners.  Inside of those liners you were to add scrapping goodies.  The categories for us were: paper, lace, bling, wood, flowers and metal.  

How could I resist? Her excited energy over altering a muffin tin spilled over into me.  And so I watched video after video after video of altered muffin tins.  Frankly, I couldn't find an actual "how to" or "tutorial" on how to complete one. We decided to swap the tins that we did at the end of August.  Which would give both of us plenty of time to finish other projects and take care of life on both of our ends.  That decision was made less than a week ago. And guess what? We're both DONE.  I filled the "cupcakes" to the brim...and still wanted to add more LOL. Take that craftingADHD!!!!!  One project done without jumping on to some other project.

Below, I've added  pics of the tin that I created for Sharon, of how some of the cupcakes or muffins turned out along with the decorated muffin/cupcake tin: (OOOPS! forgot to take pics of the crafting goodies inside)


It truly was fun. And I've already got several ideas for the next one. Wink Wink!
So, thank you Sharon for suggesting this swap!

Again, I truly appreciate you stopping by and taking a peek....

Until next time
Hugs+Kisses
Renee